How much weight does it add on? 3 coats over my crankset added 0.3g of weight. There was a net loss of weight from sanding down the original coat instead. The weight loss was slightly more for removing the Campy decals. I gained slightly below 2g for sealing a pair of stickers onto a fork. A proper clear coat job will NOT affect your build's weight significantly.


Carbon fiber is like your facial complexion - you don't worry about pimples when you eat chocolate right? Similarly, there's nothing to worry about a gash across your $9999 frame. I can fix that in 3 minutes. This guide covers the more essential steps, which should give the average rider the confidence to use his/her carbon fiber parts for a daily ride.
I assume that you know how to clean up your bike parts, degrease whatever... If you've waxed the parts, you can remove the wax with detailing clay. I also assume that you have some imagination... meaning you know how to avoid giving your house a clear coat in the process, and how to leave your parts in a suitable position for the clear coat to dry. Here's what else you need for that proper clear coat job.
MATERIALS
- Aerosol clear coat ($3.70): I recommend Nippon Pylox, which has a range of finishes (clear, gloss, matt, anodized...). Anything acrylic-based that specifies all-surface applications for motorcycles, automobiles etc. will be fine.
- Paint marker ($1.40): An all-surface paint marker for optional touch-ups. I used a uni Mitsubishi paint marker.
- Buffing/rubbing compound; polishing compound; scratch remover ($4.50, $4.50, $9.00): These have multiple uses, and most of all, will be your best friends in a repair job; I find myself using them half of the time. The rubbing compound is coarser than the polishing compound. Turtle Wax has both compounds. I saw a few value packages on Amazon which come with the microfiber cloth. If you are especially particular, you can follow-up the polishing compound with a scratch remover, e.g. 3M scratch remover, for finer work.
- White shoe polish/cream ($3.00): This helps to pick out scratch marks.
- Sanding block ($6.00): Makes your work comfortable most of all, and helps you sand the surface evenly A 3M rubber sanding block can be bought from any hardware store, sometimes in discount packages with sandpaper. Alternatively, a block of wood, or the shoe polish casing can work as a sanding block.
- Sandpaper ($0.20/sheet): Any silicon carbide, waterproof sandpaper will work. I recommend 6 grits: choose five types of grits ranging between 100 to 1500, and one at 2000 or above (the latter might be tricky to find - try car hardware shops). I use 120, 400, 600, 1000, 1500, 2000 grit sandpaper.
- Lint-free cloth ($2.10/pc): Any fabric that doesn't leave behind fluff when you wipe a surface. Microfiber cloths are the best, and easiest to find at any hardware or automobile DIY store. Get at least 2 (dry, 'wet'). Even get a few extras (for the buffing/polishing compounds). Microfiber sponge pads are even better for comfortable hand buffing/polishing. Don't use tissue.
- Alcohol swabs ($2.60/100 pcs): These are helpful for removing small specks of dust and degreasing little patches of oil films, e.g. finger prints. Available at pharmacies. The alcohol dries on its own, making it very convenient. You could also use a bottle of cleaning alcohol and cloth. Do not use these as substitutes for degreasing.
- Moisture-resistant stationery tape ($2.30): A thick roll of masking tape which can be torn by hand. Preferably something which has color contrast from what you're clear coating (e.g. white) so you can see any missing gaps in your protection. This is used to protect surfaces on your parts which you do not intend to clear coat. Scotch tape is not recommended.
- Plastic cling wrap ($2.00): For larger items like your frameset from unwanted clear coat, it is rather troublesome for you to wrap the whole thing in stationery tape. Less recommended, kitchen towels (held by stationery tape) also work.
- Test pen ($2.10): A test pen is very useful for helping you to squeeze the tape into crevices, slots etc. that your fingers can't, e.g. on your derailleur, brake levers etc. Electrical hardware stores have these. Philips makes high quality test pens if you want it as an investment. Jewellers' screwdrivers are a suitable alternative.
- Hairdryer (costs as much as your girlfriend/wife's pride): Extremely useful for smoothing the clear coat as it is drying and mitigating bubble formation under the surface.
- Car wax ($13.00): Makes your carbon fiber sparkle. More importantly, it cuts down on future maintenance (repels dirt and sweat for easy washes; and protects the clear coat from scratches). If you can afford extra money, I recommend Autoglym Super Resin Polish followed by Autoglym Extra Gloss Protection.
- Polishing wheel/rotary polisher: Actually, if you have one of these, you probably don't need this guide. Besides making short work of your polishing, this can be used to remove damages that do not go deeper than the clear coat. If you intend to buy this, I recommend that you invest in a Dremel with a low speed selection, followed by the cloth buffing wheel.
And... time: This is often understated but watching clear coat dry up is a boring job, and there are often necessary touch-ups that you won't notice until the next morning. Don't rush your work with the expectation of finishing it in one day.


Always wet sand: soak your sandpaper thoroughly in water for 1 minute before using; rinse your sandpaper frequently; there are many advantages to this. There's one exception to wet sanding, where I use the rubbing compound as the buffer medium instead (covered below).


Items 1 to 8


Items 9 to 12
Always wet sand: soak your sandpaper thoroughly in water for 1 minute before using; rinse your sandpaper frequently; there are many advantages to this. There's one exception to wet sanding, where I use the rubbing compound as the buffer medium instead (covered below).
I. SPRAYING A NEW CLEAR COAT
This is a basic process which will be used in conjunction with nearly all of the clear coat techniques covered below. I personally try my best not to spray a new clear coat, but being prepared to do so is integral to any DIY work on carbon fiber.
Necessary: aerosol clear coat, lint-free cloth, moisture-resistant stationery tape
Optional: alcohol swabs, test pen, hairdryer, sandpaper, rubbing+polishing compound, car wax
- Tape/cling wrap the piece where you do not want the coat. Clean surface with cloth or swabs.
- Shake the can. Hold 20-30cm (1 foot) away from the target. Depress the lever firmly (I'm suggesting thin coats, but we do this by limiting the number of passes rather than limiting the pressure that you're applying). Spray 3 passes over the target. Avoid build-up of clear coat. Several thin layers of clear coat is better than a thick layer. Telltale sign is that it's very misty white under the clear coat - the clear coat is curing faster on the surface than below, so the clear coat below is evaporating and condensing onto the cured surface. Don't worry if you notice this happening - just stop spraying and let it dry.
- (Optional) Immediately apply hairdryer with slow, low heat setting over the target; in passes, over 30 seconds.
- Allow the coat to dry for 10 minutes. Check for any big specks of dust that has landed on the coat inbetween, and remove lightly with cloth.
- Repeat steps 2-4 until desired finish. I think 4 coats is the maximum I've ever needed.
- Let the coat dry fully, for at least an hour. Depending on the thickness, temperature etc. it will take different amounts of time. My crankset and fork took about 2 hours. The clear coat is 'touch-dry' after 10 minutes, meaning you can safely touch the clear coat and lift your finger without peeling off the coat. However, it will still be soft to the touch. Lightly prod the coat occasionally. Once you're feeling more confident, run your hand over lightly. What you want is the coat to feel as hard as the original clear coat before you proceed.
- Inspect. There are 4 routes you can choose from here. (Proceed to 2) The clear coat is too thin, needing a repeat of steps 2-4. (Proceed to 8) You need to remove at least some parts of the clear coat because of mistakes. (Proceed to 9) The clear coat is rough, or has some rough transition to a surface where you left the original clear coat, hence needing some polishing. (Proceed to 10) It looks good.
- (Optional) Remove mistakes. Don't worry if you make a mistake; wet sand in increasing grit until at least 1500, then rinse, dry with lint-free cloth and restart step 2. If it's a small flaw, e.g. you accidentally sprayed a thin amount of clear coat past the tape/cling wrap, or onto somewhere where it's unwanted, see step 9 for solution.
- (Optional) Polish. Wet sand with 2000 grit or higher grit sand paper to even out the clear coat. Rinse, then dry with lint-free cloth. Apply buffing compound onto surface, and polish in swirls - if you have a polishing wheel, here's where you use it, then/otherwise follow up with hand buffing with a lint-free cloth. Rinse with water. Apply polishing compound onto surface, and polish in swirls with a fresh cloth (don't use the one for your buffing compound). Rinse and repeat with scratch remover if you are using it.
- (Optional) Wax. See instructions on your choice of automobile wax.

Step 1: DS crankarm after repair. Compare with coated crankarm.
(Lightning's original clear coat is crap. It cracked off where I removed the factory stickers, and I needed to repair it. In the process, I decided to strip most of the clear coat as it was thick and heavy.)

Step 7: Mirror-like finish after final layer of clear coat. Also notice how I taped the chainring holes, and used a test pen to squeeze tape into the Allen insert.


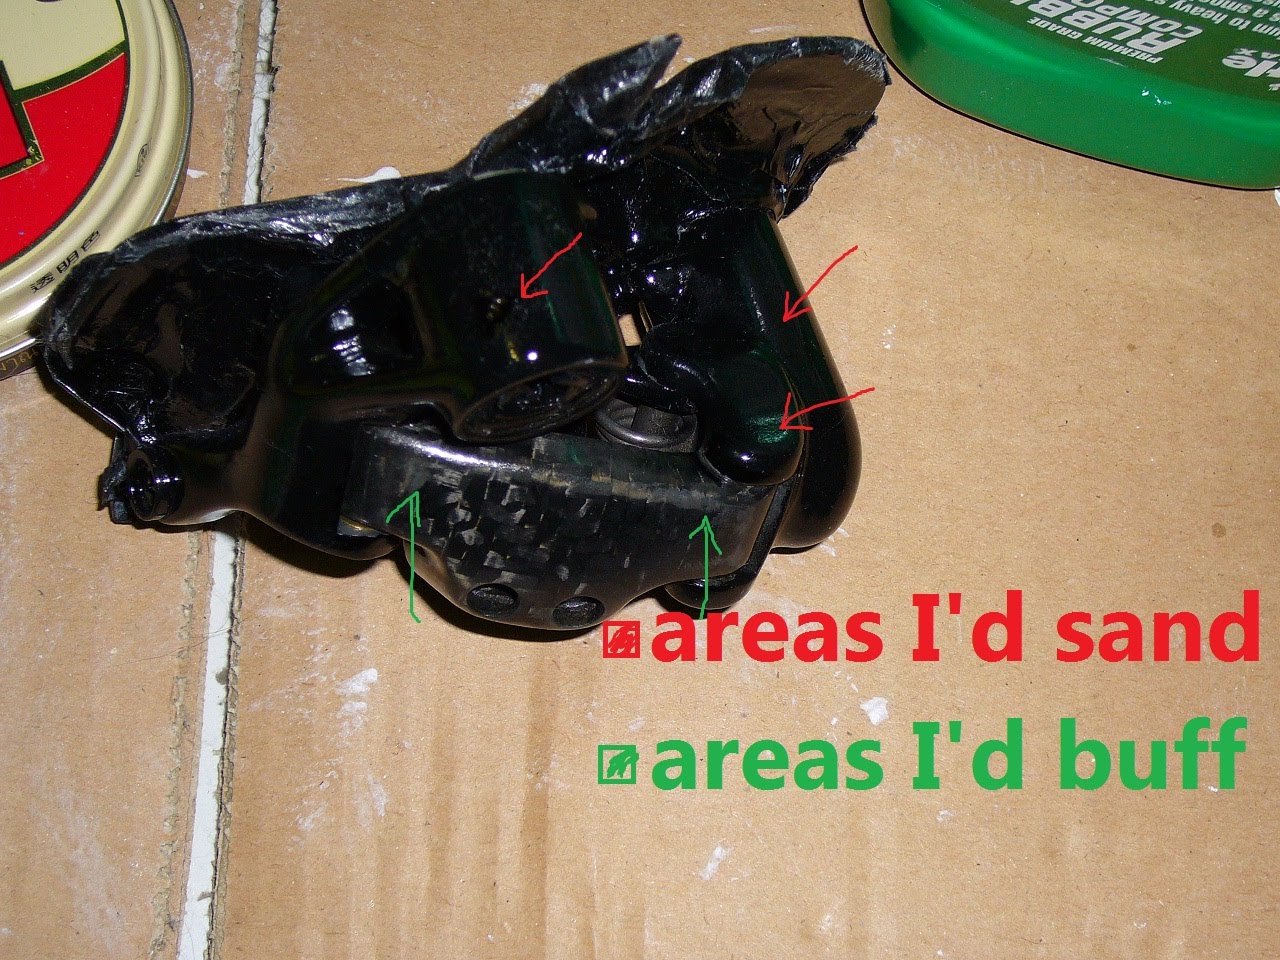
Note: Use your discretion for where you need to sand. Most parts of your clear coat should only need buffing. If you're really bad with spraying a clear coat, you'll probably have more areas needing sanding. These areas either have clear, nearly white spots, or feel like the surface of an orange (as in, the fruit).
Step 9: Here, I've labeled some areas on this rear derailleur which have a clear distinction for parts requiring both sanding and buffing (red) and parts only requiring buffing (green) after inspection.
Step 9: Here, I've labeled some areas on this rear derailleur which have a clear distinction for parts requiring both sanding and buffing (red) and parts only requiring buffing (green) after inspection.


Step 9: Smoothening the clear coat in swirls with polishing compound and buffing pad.

Final product: Notice that the clear coat is thinner now than in step 7, making the weaves more outstanding. A thick coat is also more prone to deep, ugly scratches.
This is recommended when you want to protect a sticker from peeling or fading, especially if it's a critical part of your bike's overall appearance or simply because you like the sticker, or can't bear to part with it because you paid $1000 for that pathetic decal job that really shouldn't be the case.
Follow the standard procedure for SPRAYING A NEW CLEAR COAT. Just avoid polishing over the decal with sandpaper. Only use a few passes of buffing compound, and mostly polishing compound at this area. Do NOT wipe the decals with alcohol swabs. I can't say for all decals, but AX stickers aren't resistant to alcohol. Use a microfiber cloth instead to remove dust, especially off the edges where it collects. A finer microfiber cloth like lens cleaning cloth (for spectacles, sunglasses etc.) is best here.


II. SEALING A STICKER / PROTECTING A PAINT JOB
This is recommended when you want to protect a sticker from peeling or fading, especially if it's a critical part of your bike's overall appearance or simply because you like the sticker, or can't bear to part with it because you paid $1000 for that pathetic decal job that really shouldn't be the case.
Necessary: aerosol clear coat, lint-free cloth, moisture-resistant stationery tape
Optional: alcohol swabs, test pen, hairdryer, sandpaper, rubbing+polishing compound, car waxFollow the standard procedure for SPRAYING A NEW CLEAR COAT. Just avoid polishing over the decal with sandpaper. Only use a few passes of buffing compound, and mostly polishing compound at this area. Do NOT wipe the decals with alcohol swabs. I can't say for all decals, but AX stickers aren't resistant to alcohol. Use a microfiber cloth instead to remove dust, especially off the edges where it collects. A finer microfiber cloth like lens cleaning cloth (for spectacles, sunglasses etc.) is best here.

Lens cleaning cloth: Wipe your decals' edges with a finer microfiber cloth.


Step 1: Frame wrapped in kitchen towels and stationery tape.
(Notice the dust collected on the sticker at the edges! It will start to peel at this rate.)
I found it easier to 'seal' the stickers by giving them 9 passes (3 passes over each: the top and bottom edges, and directly over sticker). Instead of passing over the edges at 90 degrees, aim at around 30 degrees from the plane of the sticker edge as you're passing over them, so that you are sealing the edges directly.

Final product: After rinsing off the polishing compound, the sticker looks almost like a permanent paint job. I didn't apply a very thick coat - you can still feel the edges of the sticker by touch, but the edges are nearly seamless to the naked eye, and most of all, it won't peel under water, dirt, grease, scrubbing etc.
II. CLEAR COAT REPAIR
Assess the damage. How do you tell that a scratch is 'shallow': if it's not as deep as something that will require a plaster or stitches if it was on your flesh (e.g. your shoe rubbing against your crankset constantly, road debris scratches on your CF front brake/frame/rims). Some scratches are actually stains! Your brake lever scrapping a painted wall may leave a 'scratch' which is really a softer paint than your lever's clear coat being deposited onto your lever. It's easy to tell if this is the case; and you can scrape the 'scratch' lightly with a test pen to ensure if it is.
If it's only a stain, scuff mark or shallow scratches, you can most likely repair it with some polishing using buffing and polishing compounds (read step 9). This is easier than applying a new clear coat.


Saddle scratches/scuffs are very shallow and can be easily removed by hand-buffing with both compounds. This saddle was also waxed with Autogylm Extra Gloss Protection previously, so the scratches incurred weren't too bad.

When you're done with sanding, and you can feel the fiber weaves of the cosmetic layer by touch, it means that you need a new clear coat. Follow the instructions for SPRAYING A NEW CLEAR COAT (picture on top right) Then sand and polish again. I notice that the carbon fiber will look grey and ugly after clear coating if you left the surface rough before applying the clear coat. Hence, don't end with a high grit. Having a smoother surface also makes your clear coat more consistent, requiring less polishing at the end.


A common manufacturer flaw, bubble 'pits' on the surface are deeper and can be spotted with rubbing compound or shoe polish.
This technique (sanding with buffing compound) is very fast, and leaves only gentle sanding marks that can be buffed away with a sponge and some compound. Here's a repeat of this trick, with a scratch on the frame as demonstration. In this case, the clear coat was thick enough that I didn't need to apply a new coat.

There's a kink and a scratch here (indicated with red arrows), pretty common if you lean your frame against a wall or something.

As we begin sanding with buffing compound, the buffing compound sinks into the kink and scratch quite clearly.

You can continue sanding until the buffing compound that sank into the flaws cannot be observed anymore, as seen here. Follow up with hand-buffing then polishing compound, rinsing inbetween.
Note: I also had the traditional AX-lightness seatpost problem where the seatpost's clear coat was too thick for insertion, but it still looked brand new after some removal work (sanding -> buffing -> polishing). Most people miss the buffing/polishing part, so they have a matt-and-gloss boundary which looks ugly - I know you guys... you try to push all of the matt under the seat clamp so that no one sees it right? I used to do that... Don't worry, there's enough clear coat there to regain a gloss surface without needing to apply a new clear coat.
See also for projects by other weightweenies.
II. REMOVING DECALS UNDER CLEAR COAT
This is typically done when the original decals spoil your color scheme, or just look like crap (e.g. Campagnolo levers, rear derailleurs).
Necessary: sandpaper
- Wet sand the surface over the decals with the coarsest grid sandpaper. Rinse frequently. (I found Campy decals really difficult to reach. I advise using a hand file, if you have one, for this step. I had a hard time using 240, so maybe lower than that will also work.) Immediately stop when you see the decals starting to fade.
- Remove remaining of decals completely by wet sanding with the the next lowest grit sandpaper.
- Continue wet sanding, increasing the grit of the sandpaper until you reach your highest grit (at least 1500). Run your hand across the surface to ensure that it is fairly smooth. For smaller items, e.g. levers, sand across the entire surface, even those areas not marred by the decals. This keeps the clear coat thickness as consistent as possible, giving your part the best appearance at the final stage.
- What remains is essentially the spraying of a new clear coat. Proceed to SPRAYING A NEW CLEAR COAT (read above for instructions).


Step 1: The original levers and the levers while hand filing at a toilet sink.

Step 3: The levers after some final 1500 grit sanding and prep-cleaning.

Step 3: A look at the grips' rough surfaces where I dremelled/sanded.
(Ergopower levers waste about 40g for the hoods' mounting notches.
By doing away with traditional hoods entirely, I could remove these.)

Step 4: The levers after the first layer of clear coat.

 Step 4: This case illustrates a clear coat which needs polishing. (left picture) Notice the rough layer along the sides of the lever blades - this part has the texture of orange peel. Some buffing compound will do the job. (right picture)


III. THE MARKER TRICK
There are little bits of silver on the Ergopower levers, or most other components which have a base black color. This doesn't look good... It's common to touch these up with a permanent marker, or a transparency marker (might have a purplish tint). However, these touch-ups wear off easily. The trick is to give these touch-ups a clear coat. A paint marker also looks best, and won't give you the purplish tint.
Necessary: paint marker, aerosol clear coat
- I like to start by giving the metallic surface a base clear coat to prep the surface so that it's smooth. Proceed to SPRAYING A NEW CLEAR COAT (read above for instructions). Be sure to tape up the other areas to protect them from the spray. You don't have to refine the base clear coat with sanding/buffing.
- Apply the paint marker on the base clear coat. Allow to dry and ensure there are no exposed patches.
- Give the touch-ups at least two more light clear coats to seal the color in. Proceed to SPRAYING A NEW CLEAR COAT (read above for instructions). Between the coats, ensure that your marker has covered the entire surface - if somehow you missed some small part, you can still patch it up over light clear coats. Just make sure there's clear coat over the marker touch-ups at the very end. You can do some very buffing/polishing to smoothen the final surface.

Step 2: Patiently shade the contrasting bits with a paint marker.
(Areas indicated with red arrows.)
IV. YOUR OWN EMBOSSED LOGO
If you've got time, cut a template with a cereal box, and glue together 2-3 layers such that it's thick enough, then apply a clear coat over the template (will be faster by brush). Follow-up with buffing and polishing for smooth edges.
CONCLUSION
In fact, these are idealized situations. Most of my repair jobs required a mix-and-mash of the techniques above, and I lazily skipped one or two steps. Some serious repair jobs will require epoxy patching, which I've not covered here. I've had all sorts of strange repair works... a brake set that my dog used as a toy, a handlebar that was used as a bra hanger...
That's how it should be: be flexible with your steps, and be confident with your technique. The most important tip I have is that anything involving the clear coat is a reversible process - sand/polish to remove; new clear coat to add. Don't worry about 'screwing up', because there's no permanent 'screw up' here.
Acknowledgments: Actually, my hands were too dirty to take proper pictures, hope these are enough. Besides me, there's Fernando M. Laksith, probably one of the best car mechanics in the country (stripped his first engine when he was like 12) working in the background... I also sacrificed 4 stickers to sanding and alcohol tests. (hehe)
24 comments:
Nice work!
^range: Thanks :D I was actually quite surprised with how well the derailleur went. It looked like I picked it out of a junkyard before repairs.
I suppose these are your parts! That's a great upgrade from the bike you were using before.
Great write up!
well done
thanks for sharing
what frame is that
^range: Yup, they're my parts.
^Frankie-B/tochnics: ^^ Thanks.
^Anonymous: Just a generic carbon frame. Don't think it's in production anymore.
Hey, I was wondering, how would I go about removing the "ghost" marks left behind on my carbon fork after I removed them with a razor blade while the decals were under the clear coat?
Any help is appreciated. Thank you.
Here's a pic:
http://i937.photobucket.com/albums/ad217/psychomonkey321/DSCN07721.jpg
^Patrick: It looks to me that the decals weren't completely removed. Judging from the picture, how I'd clean that up it is to wet sand the decal marks with 600 grit until the marks *just* disappear, then immediately change to 1500 grit and continue wet sanding till the area has a consistent texture, then hand buff it with a rubbing compound.
Then if you had some more money to spare, you could get a polishing compound to follow-up the rubbing compound, but the effect is minimal.
There's most likely enough clear coat underneath the decal that you don't have to respray. But I'll just point out that there's another kind of 'ghost mark' where the clear coat at the area where you've sanded is too thin compared to the surrounding area - you'll see a patch of 'greyish' carbon fiber in that case. That's when you need to respray.
What you see is actually not the remaining decals, butthe missing decals along with the clear coat. So the 'Bianchi' area is really bare carbon fiber already. Sorry for the confusion.
What would I have to do in this situation? Thanks for your help.
Okay, I took a closer look at the photo and it seems like the cosmetic layer is still visible under where the decals previously were. Am I correct?
You'd to first carefully sand away the outline of the removed chunks of clear coat, and the areas surrounding it further at large (something like an inch below the "B" and 1cm above the "i" at the top). You don't have to 'level off' the whole area, just make the gradient of transition between the surrounding to the removed area more gradual.
Use something around 200 until the moment it *nearly* looks right, but still needs a little more sanding. Change to 400, and start feeling if the gradient is gradual. Once the gradient is gradual (you should hardly be able to see the outline where the decal previously was), change to 600 and start feeling if the sanded surface is smooth. (400+/- still leaves a rough feeling). Once you're satisfied, just give the whole area a very light sanding (less than 10 passes) with 1000 grit sandpaper.
The MOST IMPORTANT THING is that at this point, you should not be able to see the words 'Bianchi', but instead a whole area of dull, matt carbon. At no point you'll be removing the bare carbon since the 'removed area' gives you a datum: so long as you don't sand deeper than that, it will be fine.
The remaining instructions are very straightforward.
You'll have to do two things. Use tape to cover up the area with the cosmetic carbon (somewhere in the middle of the 'h' of 'Bianchi' where it previously was) and below. Tape up areas where you'll want to protect from spray. You'll have to use a black spraypaint to patch up the paint in that little bit of area where there's no carbon. After a few coats, lightly sand the surface (this is just to make it rough on the microscopic scale, which is good for the clear coat).
After you're done painting, remove the tape that's covering the sanded area. Follow clear coat instructions for coating the sanded area, including the part where you've just painted. Regloss the whole area where you've sanded.
Thanks for all your help. I'll give it a try.
You're most welcome. I'm happy if it helped.
I might not be the best at this: some people have suggested sanding with 1000 grit after the first layer of clear coat to improve on the finishing. Be sure to search on sanding/spraying clear coats in general if you're not sure, you may find advice that is missing here.
I have recently purchased new carbon rims. During transportation clear carbon coating was damaged and started delaminating (2-3 mm at the edge of the rim). Do I need to use clear primer? Something like DuPont Plastic Adhesion Promotor (or any other brand plastic primer)
http://sdstds.dupontrefinish.info/resources/ds_2/DOC/DATA/TDS/EN/EN%20800RA.pdf
Or just auto acrylic lacquer clear coat could do the job and do not delaminate in the future?
I live in the US and we do not carry Nippon Pylox. What would be a good brand to use? I want to get the best possible to replace the clear coat on my bike frame. Thanks!
I always like your blog post because you always comes with different ideas and information. I always shared your site post with my friends. Keep posting and i will follow you.
carbon fiber wheelset
Great tips and tricks. Very confidence inspiring. Thank you.
One question, do you have any advice for recoating the braking surface of a set of carbon rims? The clear coat has just begun to wear and I figured if they could be recoated they would last a bit longer. Any advice on prep and the right clearcoat to use given the temps the rim will be subjected to would be greatly appreciated.
What are your thoughts on clear coat pens? I have a couple small (a few sq mm) chips in my original clear coat and would like to repair and protect those spots. Could save a lot of time and effort by using a touch up pen - but only if it works.
A very good and informative article indeed. It helps me a lot to enhance my knowledge, I really like the way the writer presented his views.carbon bike wheelset
Offers a high performing Nyalic® coatings to protect your construction & industrial equipment’s.
They are the best in reusing and evacuating the piece vehicles. Do we have any thought regarding Clunkers or garbage vehicles?. On the off chance that we don't have any thoughts, at that point Scrap Car Removal will assist us with solving our concern. Scrap Car Removal Etobicoke Scrap Car Removal London Ontario
Scrap Car Removal Kitchener Scrap Car Removal Cambridge
Junk Car Yard Junk Car Removal Brampton Scrap Car Removal Georgetown Scrap Car Removal
Scrap Car Removal Waterloo Scrap Car Removal Mississauga
A few cases may take somewhat more, anyway we endeavor to keep it inside this time span. However long the best possible desk work is there and the title is marked, we can get garbage vehicles for expulsion from anyplace. The desk work and title should be with the vehicle however Junk Car Removal Brampton
Get the administrations from organizations whose principle objective is to give most ideal cost in return of trade-in vehicles. Rejecting your garbage will be effortlessly done. You'll be paid top money
Scrap Car Removal Brantford
Particle Tracks :: Ephedyn.Com: The Comprehensive Guide To Clear Coat Techniques For Carbon Fiber >>>>> Download Now
>>>>> Download Full
Particle Tracks :: Ephedyn.Com: The Comprehensive Guide To Clear Coat Techniques For Carbon Fiber >>>>> Download LINK
>>>>> Download Now
Particle Tracks :: Ephedyn.Com: The Comprehensive Guide To Clear Coat Techniques For Carbon Fiber >>>>> Download Full
>>>>> Download LINK ff
Post a Comment